Showing posts with label Jquery. Show all posts

Free jquery plug in for modal popup,tab control,slider,validations

Posted by Unknown 0 comments
Free jquery plug in for modal popup,tab control,slider,validations

Today i found a very usefull free jquery plug in while googling.i.eqTip2 jquery plug in
Here we have preprocessed jquery plug in for modal popups,tab control,slide and form validation

Click here to see the demo and download


Labels:

how select default folder in file upload control in asp.net

Posted by Unknown 0 comments
how select default folder in file upload control in asp.net

i found a problem with asp.net file load control is that we don't have option to set a default folder while file browser opened .
In order to archive these i found some other alternatives where we can  get more options while uploading the file like multiple uploads,drag and drop files to upload etc

one is silk upload is best option which having many functionality related to file uploading
here you can fine the links 

http://slickupload.com/demos

we can do this by flash also check bellow link

http://www.codeproject.com/Articles/15742/Multiple-File-Upload-With-Progress-Bar-Using-Flash


See demo Bellow


Hope this will helps you

Labels: , ,

Excel kind of filters in Kendo UI Grid

Posted by Unknown 0 comments
Excel kind of filters in Kendo UI Grid

 In this post am explaining  how to implement excel kind of filters in kendo ui grid.
See example Bellow
new


Step 1:Grid intialization
var isloaded=false;
grid = $("#grid").kendoGrid({
            dataSource: {
                transport: { read: "/control/action(or your URL)" },
                schema: { data: "Data", total: "Total" },
                pageSize: 30,
                serverPaging: false,
                serverFiltering: false,
                serverSorting: false
            }
});

Step 2:
Need to Override the required field filter functionality. So find out filter click of particular column and unbind the click event and write click for custom filter

Before that write DIV for showing our custom filter

<div id="CustomFilterDiv" class="filterDropdown">
 </div>
<style>
    .filterDropdown {
        display:none;
        position: absolute;
        border: 2px solid gray;
        background-color: white;
        padding: 5px;
    }
</style>
Here is the code for overriding filter click Functionality
$("#grid").find(".k-grid-filter").each(function () {
            var parent = $(this).parent();
            var filterList;
           
            //alert(parent.attr("data-field"));
            switch (parent.attr("data-field")) {
                case "Status"://*your data filed name*//
                   $(this).unbind("click").click(function () {

                        fillCheckBoxes();
                        filterList = $("#CustomFilterDiv");
                        var offset = $(this).offset();
 filterList.css('top', offset.top + $(this).height()+10)
.css('left', offset.left + $(this).width()).slideDown();
                        return false;
                    });
                    break;
                           
            }
});
Step3:
Here we need fill our dropdownDIV with checkboxes of all unique values of a selected column
  function fillCheckBoxes() {  
       if (!isloaded) {  
         $("#CustomFilterDiv").empty();  
         $("#CustomFilterDiv").append('<input type="checkbox" style="" name="StatuschkAll" value="checkAll" checked /><span>Select All</span><br />');  
         var data = grid.data("kendoGrid").dataSource.data();  
         var uniqueValues = '';  
         for (var i = 0; i < data.length; i++) {  
           var dataItem = data[i].Status;  
           if (!(uniqueValues.indexOf(dataItem)>=0))  
           {  
             uniqueValues += dataItem + ",";  
             $("#CustomFilterDiv").append('<input type="checkbox" style="" name="Status" value="' + dataItem + '" checked /><span>' + dataItem + '</span><br />');  
           }  
         }  
         $("#CustomFilterDiv").append(' <br /><input type="button" id="applyStatusFilter" value="Apply" /><input type="button" id="cancelStatusFilter" value="Cancel" />');  
         //filter apply click  
         $("#applyStatusFilter").click(function () {  
           setDsFilter(generateDsFilter());  
           $("#CustomFilterDiv").slideUp();  
         });  
         //filter cancel click  
         $("#cancelStatusFilter").click(function () {  
           $("#CustomFilterDiv").slideUp();  
         });  
         //check all filter  
         $('input[name="StatuschkAll"]:checkbox').live("change", function () {  
           var ischecked = $(this).is(":checked");  
           $('input[name="Status"]:checkbox').each(function () {  
             this.checked = ischecked;  
           });  
         });  
         //uncheck/check parent all  
         $('input[name="Status"]:checkbox').live("change", function () {  
           $('input[name="StatuschkAll"]:checkbox')[0].checked = $('input[name="Status"]:checkbox:checked').length == $('input[name="Status"]:checkbox').length;  
         });  
         if(uniqueValues!='')  
            isloaded = true;  
       }  
     }  
     $("#grid").click(function () {  
       $("#CustomFilterDiv").slideUp();  
     });  
   }  
Step 4:

Generate the filter query based on selection of dropdownDIV


  function setDsFilter(customFilter) {  
     grid.data("kendoGrid").dataSource.filter(customFilter);  
   }  
   function generateDsFilter() {  
     var checkboxContainer = $("#CustomFilterDiv");  
     var flt = { logic: "or", filters: [] };  
     checkboxContainer.find("input:checked").each(function () {  
       var name = $(this).attr("name");  
       var value = $(this).attr("value");  
         if (value == 'null')  
        flt.filters.push({ field: name, operator: "eq", value: null });  
        else   
         flt.filters.push({ field: name, operator: "eq", value: value });  
     });  
     return flt;  
   }  

Hope this will helps you
Labels: ,

jquery pass form data to ajax by using (form.serialze())

Posted by Unknown 0 comments
jquery pass form data to ajax:

To pass the entire form data to ajax call with j query, here we have very simple code snippet


var data = $('YourFormId').serialize();
$.post('yourURL', data,function(succees){....});

or you use the bellow
var Mydata = $('YourFormId').serialize();
   $.ajax({
       type: "POST",
        url: "yourUrl",
        data: Mydata ,        success: function(response, textStatus, xhr) {
            alert("success");
        },
        error: function(xhr, textStatus, errorThrown) {
            alert("error");
        }
    });
Hope this will helps you
Labels:

jquery validate form before ajax post

Posted by Unknown 0 comments
jquery validate form before ajax post:

Use submit handler to validate your form in ajax submission


$(document).ready(function() {
    $('#FormId').validate({
        submitHandler: function(form) {
            $.post('/sample.aspx/getmethod', $('#FormId').serialize());        }
    });
}); 
See demo here
Labels:

Add values from dialog popup to parent page dynamically

Posted by Unknown 0 comments

Add values from dialog popup to parent page dynamically


use this line of code in jquery to get the values from the popup to the parent page:

if you want to display values in  in textbox of parent page use this:
 
  parent.top.$("input#txtEmpNo").val("EH0001");

or

if you want to display values in  in div tag of parent page use this:

parent.top.$("#txtEmpNo").html("EH001");

Hope this will helps you


Labels:

jquery dialog not opening in browser

Posted by Unknown 0 comments
while implementing jquery modal popup i got bug with crome and IE browser, where as its working fine in firefox.
there are so many ways to implement jquery model popup but best way to implement jquery popup is

see bellow code:
$(function () {

$("#foo1").click(function(){
  $("#bar1").dialog('open');
});


$("#bar1").dialog({
    autoOpen: false,
    width: 400,
    modal: true,
    resizable: false,
    buttons:{
            "Save": function(){
//this is optional you can implement your own functionality
                        $.post('remote_foo.aspx', $('#waka').serialize(), function(data){
                    $('#list').html(data);})
                    $(this).dialog("close");
                    $('.dial').val('');
                    $('.url').val('http://');

                    },


            "cancel": function(){
                $(this).dialog("close");
            }
        }//buttons ending
    }); //dialog ending


})// doc ready ending
go though the bellow links
http://stackoverflow.com/questions/9122008/why-is-this-jqueryui-dialog-not-working-in-ie9
http://stackoverflow.com/questions/12779789/jquery-ui-dialog-not-displaying-in-iehttp://forum.jquery.com/topic/jquery-dialog-sometimes-not-showing-in-google-chrome

Labels:

Building Web Chat Apps with SignalR, Part 2

Posted by Unknown 0 comments


In the Part1 ,I covered how to use the SignalR persistent connection API to create a simple real-time chat Web application. This installment will cover how to use the Signal R Hub API in concert with KnockoutJS to create real-time data entry Web application. Multiple users will be able to update the same person record simultaneously, and will be automatically updated when another user makes a change to that record.
To get started, create a new C# ASP.NET MVC 4 project in Visual Studio 2012. Then, select the Internet Application template option.
Next, you need to obtain the SignalR NuGet Package through the NuGet Package Manager. After installing SignalR, add the necessary ASP.NET MVC routing rules for the Hub API. Open up the App_Start\RouteConfig.cs file and add a using statement for the Microsoft.AspNet.SignalR namespace. Then add the following Signal R Hub route before the default routing rule.
RouteTable.Routes.MapHubs();
Your completed RegisterRoutes method should now look like this: 
public static void RegisterRoutes(RouteCollection routes)
 {
     routes.IgnoreRoute("{resource}.axd/{*pathInfo}");

     RouteTable.Routes.MapHubs();

     routes.MapRoute(
         name: "Default",
         url: "{controller}/{action}/{id}",
         defaults: new { controller = "Person", action = "Index", id = UrlParameter.Optional }
     );
 }
Now it's time to set up the Entity Framework model for the person data model. The first step is to create a new Person class file within the Models folder. I'll be making use of Entity Framework Code-First, so the Person class will be a plain old CLR object (POCO). Then I add Id, FirstName, LastName, and Email properties to the class, and make the Id field required. The class should look like this:


using System.ComponentModel.DataAnnotations;

namespace VSMSignalRPart2Demo.Models
{
    public class Person
    {
        [Required]
        public int Id { get; set; }
        public string FirstName { get; set; }
        public string LastName { get; set; }
        public string Email { get; set; }
    }
}
Now a DbContext class is needed to support updating a Person Entity. Create a new class named PersonContext that inherites from System.Data.Entity.DbContext, and that contains a single property of type DbSet<Person> named People:
using System.Data.Entity;

using System.Data.Entity;

namespace VSMSignalRPart2Demo.Models
{
    public class PersonContext : DbContext
    {
        public DbSet<Person> People { get; set; }
    }
}
Now it's time to implement the PersonHub class that will use Entity Framework (EF) to create, read, update and delete Person records in real-time using Signal R. First create a Hubs folder, then create an empty PersonHub class file in it.
Next, add using statements for the Microsoft.AspNet.SigalR.Hubs and the Models namespace for your project to the PersonHub class file. Then, make the PersonHub class inherit from the Hub class.
Now it's time to implement the GetAll method, which will retrieve all the existing Person records from the database via EF. Once the records are retrieved, the Hub API is used to push the collection of Person records to the client via the call to Clients.Caller.allPeopleRetrieved (people). The peopleAll method is a JavaScript method that will be implemented later to handle displaying the received Person records.
public void GetAll()
 {
     using (var context = new PersonContext())
     {
         var people = context.People.ToArray();
         Clients.Caller.allPeopleRetrieved (people);
     }
 }
Next let's implement the Add method Listing 1 that will create a new Person record and notify all connected clients that a new Person record was created. First, a new Person record is created. Then its properties are set from the passed in newPerson instance. Next, the new Person record is persisted to the database. Finally, all connected clients are updated via the Clients.All.personCreated Hub API call.
The personCreated method is a JavaScript method that will be created later. In addition, I catch any exceptions raised from the server by calling the client-side method Clients.Caller.raiseError. The raiseError method is a JavaScript method that will be created later; it will display the an error stating “Unable to create a new Person” to the user.
Now let's implement the Update method, as shown in Listing 2. First, the existing person is retrieved from a newly-created PersonContext. If the person exists, its properties are then updated from the passed-in updatedPerson Person object. Once the Person record is committed to the database, the connected clients are notified via the Clients.All.personUpdated call.
The personUpdated method is a JavaScript method added later to handle displaying the updated user to an individual client. In addition, any errors are caught and an error message stating “Unable to update the Person” is raised to the calling client.
The last remaining PersonHub method is the Delete method Listing 3. First, the Person record is retrieved from its given Id value. If the existing person is found, the delete is committed to the database. Once the delete transaction has been completed, all connected clients are notified via the Clients.All.personRemoved call.
The personRemoved method is a JavaScript method implemented later to handle removing a person record from an individual client. In addition, any exceptions are caught; if one occurs, it's raised to the client via the Clients.All.raiseError call.
Now it's time to implement the client-side JavaScript view model that utilizes KnockOutJS and SignalR to update a bound HTML view. Create a new JavaScript file in the Scripts folder named PersonManager.js. Next, add a JavaScript reference statement for the SignalR JQuery Plug-In JavaScript file as follows, to enable intellisense for the SignalR JavaScript API:
/// <reference path="jquery.signalR-1.0.0-rc1.js" />
To ensure that the client side code is only invoked when the document is ready, add an empty JQuery parent function:
$(function () {
});
First, let's implement the personViewModel that will be used to bind an individual rendered Person record to the view. A personViewModel is constructed from a given, id, firstName, lastName, email and owner peopleListViewModel instance.
The id, firstName, lastName, and email properties are setup as KnockOut observable instances. This allows the view model to be bound to an HTML form via a data-bind attribute, as will be covered later. The view model also has a removePerson function that invokes the deletePerson method on the given owner peopleListViewModel. Lastly the firstName, lastName and email properties are setup to notify the owner object of any changes via the owner's updatePerson method. See Listing 4 for the completed personViewModel implementation.
Now it's time to implement the peopleViewModel that will be bound to a table in the view. The peopleViewModel is a collection of personViewModel models that interacts with the PersonHub server to create, read, update and delete Person records. The first step is to retrieve the personHub connection through the SignalR API:
function peopleViewModel() {
    this.hub = $.connection.personHub;
Next, I initialize the peopleViewModel properties to be KnockOut observable objects:
this.people = ko.observableArray([]);
this.newPersonFirstName = ko.observable();
this.newPersonLastName = ko.observable();
this.newPersonEmail = ko.observable();
Then the people, self, and notify fields are initialized:
var people = this.people
var self = this;
var notify = true;
Next, the init method is defined and set up to call the getAll method on the PersonHub server.
this.init = function () {
this.hub.server.getAll();
}
After that, the allPeopleRetrieved method is invoked from the PersonHub's GetAll method. The allPeopleRetrieved method maps the given Person array to a new array of personViewModel objects:
this.hub.client.allPeopleRetrieved = function (allPeople) {
    var mappedPeople = $.map(allPeople, function (person) {
        return new personViewModel(person.Id, person.FirstName,
            person.LastName, person.Email, self)
    });
  people(mappedPeople);
}
The personUpdated method updates the bound personViewModel to the received updatedPerson Person record from the PersonHub server:
this.hub.client.personUpdated = function (updatedPerson) {
     var person = ko.utils.arrayFilter(people(),
         function(value) {
             return value.id == updatedPerson.Id;
         })[0];
     notify = false;
     person.firstName(updatedPerson.FirstName);
     person.lastName(updatedPerson.LastName);
     person.email(updatedPerson.Email);
     notify = true;
 };
The raiseError method binds the given error string from the PersonHub to the error div DOM element in the view:
this.hub.client.raiseError = function (error) {
     $("#error").text(error);
 }
The personCreated method updates the people collection with the received Person model record from the PersonHub:
this.hub.client.personCreated = function (newPerson) {
     people.push(new personViewModel(newPerson.Id, newPerson.FirstName, newPerson.LastName,
         newPerson.Email, self));
 };
The personRemoved method removes the Person model record from the PersonHub with the given Id from the people collection:
this.hub.client.personRemoved = function (id) {
    var person = ko.utils.arrayFilter(people(), function(value) {
        return value.id == id;
    })[0];
    people.remove(person);
}
The createPerson function creates a new personViewModel from the newPersonFirstName, newPersonLastName, and newPersonEmail properties. Then it calls the Add method on the PersonHub to save the Person record to the database. Finally, it clears the new person field properties.
this.createPerson = function () {
        var person = { firstName: this.newPersonFirstName(), lastname: this.newPersonLastName(), email: this.newPersonEmail() };
        this.hub.server.add(person).done(function () {
            console.log('Person saved!');
        }).fail(function (error) {
            console.warn(error);
        });
        this.newPersonEmail('');
        this.newPersonFirstName('');
        this.newPersonLastName('');
}
The deletePerson method calls the Delete method on the PersonHub to delete the given Person record by Id from the database: 
this.deletePerson = function (id) {
     this.hub.server.delete(id);
}
The updatePerson method calls the Update method on the PersonHub, passing in the given Person record:
this.updatePerson = function (person) {
    if (notify) {
        this.hub.server.update(person);
    }
}
See Listing 5 for the completed peopleViewModel implemenatation.
Now that the view models are created, a new peopleViewModel can be bound through KnockOutJS  as follows:
var viewModel = new peopleViewModel();
ko.applyBindings(viewModel); 
Finally, the PersonHub connection is started, with a continuation to initialize the viewModel:
$.connection.hub.start(function () {
        viewModel.init();
    });
Listing 6 contains the completed PersonManager.js implementation.
The next step is to create a PersonController that will be used to render a Person record view. Add an empty MVC Controller class file named PersonController.cs. The completed PersonController should look like this:
using System.Web.Mvc;

namespace VSMSignalRPart2Demo.Controllers
{
    public class PersonController : Controller
    {
        //
        // GET: /Person/

        public ActionResult Index()
        {
            return View();
        }
    }
}
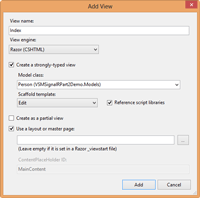
Next, add a new View for the PersonController's Index action, as seen in Figure 1.
[Click on image for larger view.]
Figure 1. Adding a Person View.
The final step is to finish the view. Open up the Index.cshtml for the newly-created Razor view. You should now have a basic view implementation for the Person model. Now copy the markup fromListing 7 from below the @model declaration.
The major changes I've made from the default view implementation is to add the data-bind attribute to the FirstName, LastName and Email view bindings. In order to add a data-bind attribute, I replaced the generated Html.EditorFor calls with Html.TextBoxFor calls, and set the appropriate @data_bind HTML attribute. For example, to bind the FirstName Person model property to the newPersonFirstName property to the client peopleViewModel.newPersonFirstName field, I add the following Html.TextBoxFor call to the view:
@Html.TextBoxFor(model => model.FirstName,  new { @data_bind = "value: newPersonFirstName" })
I've also added an additional error div element to display any errors that may occur during a SignarlR call. In addition, I changed the standard BeginForm call with a standard <form> element that binds a POST action to the createPerson method on the KnockOut peopleViewModel.
The last major change to the generated view is the inclusion of the editable persons table. The table is created by using a KnockOut HTML template that loops over the records in the peopleViewModel.people collection. The template is created as a script tag, as shown in Listing 8.
As you can see, the template includes a new table row with cells for the firstName, lastName and email properties for a personViewModel instance, in addition to a delete button that invokes the removePerson method on the view model. You'll also notice that I'm using a slightly different binding for the table values. The “valueUpdate: ‘afterkeydown'” binding option will force the binding to update the view model as soon as a key is pressed.
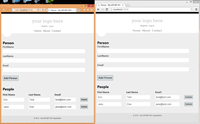
Congratulations -- you've just created your first real-time data entry form (Figure 2) using ASP.NET MVC 4, SignalR and KnockOutJS!
[Click on image for larger view.]
Figure 2. The completed sample application.
SignalR is a very powerful API to have at your disposal when creating Web applications. Combined with KnockOutJS and ASP.NET MVC 4, you have a potent trifecta to tackle the world of real-time Web development.
Labels: , ,

Building Web Chat Apps with SignalR, Part 1

Posted by Unknown 0 comments
In this am going to explain about building a web Apps with signalR
From the past few days so many dev's are discussing about signalR,i want to give brief explanation about what is signalR and how it works.

With SignalR, you can provide content to your users in real-time, all from ASP.NET. Most importantly, it's compatible with browsers ranging all the way back to IE6! SignalR uses WebSockets on supported browsers and will fall back to server-side events, Forever Frame, or AJAX long polling if needed. This means you can use a single library and not have to worry about that minutia.
Building a Chat Web App with Signal R, Part 2
There are two approaches you can use with SignalR to achieve real-time communications: a persistent connection or a hub. The persistent connection API allows you to keep open a persistent connection between the client and server to send and receive data. The hub API is an abstraction above the persistent connection API, and is suitable for remote procedure calls (RPC).
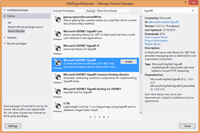
This article will focus on the persistent connection API. I believe the best way to learn a new technology is to build something useful with it, so we'll create a chat client using SignalR. To get started, create a new C# ASP.NET MVC 4 project from Visual Studio 2012, then select the Web API option for your project type. Next, install the Microsft SignalR pre-release NuGet package through the NuGet Package Manager (Figure 1).

[Click on image for larger view.]
Figure 1. Installing the SignalR pre-release NuGet package.
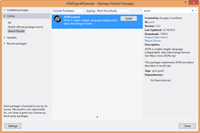
In order to support IE 6 and 7, install the JSON-js-json2 NuGet Package as well, as shown in Figure 2.

[Click on image for larger view.]
Figure 2. JSON2 NuGet package installation.
Without further ado, let's get started on this app. First create a new folder in the project named Chat. Then create a new class named ChatConnection within the Chat directory that inherits from PersistentConnection. You'll need to add a using statement for the Microsoft.AspNet.SignalR namespace.
Now open up the RouteConfig class under the App_Start folder in the project. Add a using statement for the Microsoft.Asp.Net.Signal namespace to the RouteConfig class:
using Microsoft.AspNet.SignalR;
Next, register the ChatConnection class to the "chat" route in the RegisterRoutes method in the RouteConfig class:
RouteTable.Routes.MapConnection<ChatConnection>("chat","chat/{*operation}");
Your completed RouteConfig class should resemble Listing 1.
Now to create the ChatData data structure that will be used to interchange data between the client and the server. Create a new class named ChatData with Message and Name string data type properties:
namespace VSMSignalRSample.Chat
{
    public class ChatData
    {
        public string Name { get; set; }
        public string Message { get; set; }

        public ChatData()
        {
        }

        public ChatData(string name, string message)
        {
            Name = name;
            Message = message;
        }
    }
}
Now it's time to finish implementing the ChatConnection class, which will receive and broadcast chat messages. Add using statements for the System.Threading.Tasks and Newtonsoft.Json namespaces. Next, add a private Dictionary<string, string> to store the clients that connect to the chat room:
private Dictionary<string, string> _clients = new Dictionary<string, string>();
The PersistentConnection base class includes functionality for dealing asynchronously with a few critical server-side events such as a new connection, disconnection, reconnection and data retrieval. Let's implement the OnConnectedAsync event handler first. When a new user first joins the room, they're added to the _clients Dictionary object, which will be used to map the user's chosen chat name with their connectionId. Then a broadcast message is sent to all users, letting them know a new user has joined the chat room:
protected override Task OnConnectedAsync(IRequest request, string connectionId)
{
    _clients.Add(connectionId, string.Empty);
    ChatData chatData = new ChatData("Server", "A new user has joined the room.");
    return Connection.Broadcast(chatData);
}
Now it's time to tackle data retrieval from a connected client through the OnReceivedAsync event handler. First, the JSON data object from the client is desterilized into a ChatData object through JSON.NET. Then the user's name is stored in the _clients dictionary. Finally, the user's ChatData is broadcast to all users:
protected override Task OnReceivedAsync(IRequest request, string connectionId, string data)
{
    ChatData chatData = JsonConvert.DeserializeObject<ChatData>(data);
    _clients[connectionId] = chatData.Name;
    return Connection.Broadcast(chatData);
}
The last event to handle is client disconnection, via the OnDisconnectedAsync method. When a user disconnects, he or she is removed from the _clients dictionary. Then a message is broadcast to all users, letting them know a user has left the room:
protected override Task OnDisconnectAsync(IRequest request, string connectionId)
{
    string name = _clients[connectionId];
    ChatData chatData = new ChatData("Server", string.Format("{0} has left the room.", name));
    _clients.Remove(connectionId);
    return Connection.Broadcast(chatData);
}
Now it's time to create the client-side JavaScript that will communicate with the persistent chat connection to display incoming chat messages and chat room events to the user. Create a new JavaScript file named ChatR.js within the Scripts folder. The first step is to retrieve the server chat connection object through the SignalR JavaScript plug-in:
var myConnection = $.connection("/chat");
Next, the received event is set up to display a received chat message as a new list item element in the messages unordered list DOM element:
myConnection.received(function (data) {
        $("#messages").append("<li>" + data.Name + ': ' + data.Message + "</li>");
    });
After that, the error handler for the connection is set up to display a console warning. This is mainly to ease debugging of the chat connection:
myConnection.error(function (error) {
        console.warn(error);
    });
Lastly, a connection is initiated to the chat server and a continuation is set up to handle the message send button-click event. Within the button-click event handler, the user's name and message are retrieved from the name and message text boxes, respectively. Then the user's name and message are sent to the chat server as a JSON object, as shown in Listing 2.
Now it's time to set up the UI for the Web application. Add a new MVC View class to the Home directory, named ChatR, that binds to the Chat.ChatData model. In the bottom of the view add a script reference to the ~/Sciprts/ChatR.js script created earlier:
@{
    ViewBag.Title = "Chat";
}

<h2>Chat</h2>

@using (Html.BeginForm()) {
    @Html.EditorForModel();

<input id="send" value="send" type="button" />
<ul id="messages" style="list-style:none;"></ul>
}   
    
@section Scripts { <script src="~/Scripts/ChatR.js"></script> }
Now, add a controller action method named ChatR to the HomeController that returns a new view bound to an empty Chat.ChatData object:
public ActionResult ChatR()
 {
     var vm = new Chat.ChatData();
     return View(vm);
 }
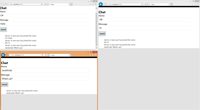
That's it: sit back, relax and invite a few friends to try out your new chat app, shown in Figure 3.

[Click on image for larger view.]
Figure 3. The completed real-time chat application.
As you can, see SignalR is quite easy to work with and the PersistentConnection API is very flexible. With SignalR, you can tackle a plethora of real-time Web app use cases from business to gaming. Stay tuned for the next installment, which covers how to use the SignalR Hub API to create a dynamic form.
Building a Chat Web App with Signal R, Part 2
Labels: , ,
 
test