Showing posts with label WindowsPhone. Show all posts

GetCopyToOutputDirectoryContentProjectItems- Solution(fixed) in wp7

Posted by Unknown 0 comments
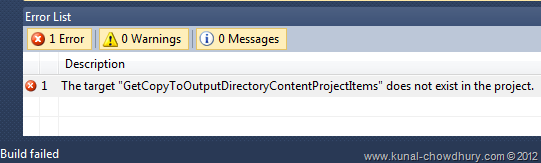
GetCopyToOutputDirectoryContentProjectItems 

The target “GetCopyToOutputDirectoryContentProjectItems” does not exist in the project
How to resolve this issue
In the cases that I’ve seen this error in the past, it was caused by XNA Game Studio 4.0 not being correctly installed on the computer.  If you encounter this error, I suggest trying one of the following:
  1. Repair or re-install the Windows Phone SDK 7.1, which will repair XNA Game Studio 4.0 behind the scenes.
  2. If #1 does not help, then you can use the cleanup tool described at http://blogs.msdn.com/astebner/pages/9544320.aspx to remove the Windows Phone SDK 7.1 and then re-install it.
Setup could not install the following components:
  • Microsoft XNA game Studio 4.0 Refresh
  • Windows Phone SDK 7.1 Extensions for XNA Game Studio 4.0
sdk error
Labels:

Get Device info in windows phone development

Posted by Unknown 0 comments
Get Device info in windows phone development

In this post am going to explain you how get Device info information of windows phone 7 application

Here is very small code snippet which will get the Device info information 


 Public void GetDeviceInfo()  
 {  
 string DeviceUniqueId=Convert.ToBase64String((byte[])DeviceExtendedProperties.GetValue("DeviceUniqueId");  
  string DeviceModelName= null;  
       object theModel = null;  
  if (Microsoft.Phone.Info.DeviceExtendedProperties.TryGetValue("DeviceName", out theModel))  
    DeviceModelName= theModel as string;  
 }  

Hope this will helps you 
Labels:

Get OS Info of Windows phone

Posted by Unknown 0 comments
Get Operating system(OS) information in windows phone 7 application

In this post am going to explain you how get Operating system(OS) information of windows phone 7 application

Here is very small code snippet which will get the Operating system(OS)  information 


public string GetOSVersion()
{
 string  OSVersion=Environment.OSVersion.Version.ToString();
return OSVersion;
}


Hope this will helps you
Labels: ,

Get Version information of windows phone 7 application

Posted by Unknown 0 comments
Get Version information of windows phone 7 application

In this post am going to explain you how get version information of windows phone 7 application

Here is very small code snippet which will get the version information 

Public string GetVersionInfo()
{
String Assemblyinfo=Assembly.GetExecutingAssembly().FullName;
string[] versionInfo =Assemblyinfo.split(',');
string versionName=versionInfo[1];

return versionName;

}
Labels: ,

Windows Phone 8 isolated storage

Posted by Unknown 0 comments
Labels:

Regex find at least one of two characters

Posted by Unknown 0 comments
Labels: ,

web client request caching issue in wp7 app

Posted by Unknown 0 comments

jump list in windows phone 7

Posted by Unknown 0 comments

Creating context menu with Windows Phone7

Posted by Unknown 1 comments
Creating context menu with Windows Phone7

In this post am going to explain about creating a context menu in windows phone

in order to implement context menu i have taken one button here when i have long press on the button i want to show the context menu

in the context menu item i want to add the option pin to start screen

Here you can find the code bellow:


<button background="{StaticResource BrushGold}" click="btnAppStatus_Click" height="120" horizontalcontentalignment="Stretch" margin="0,0,0,32" padding="0" verticalcontentalignment="Stretch" x:name="btnAppStatus">
                                    <grid>
                                        <grid .background="">
                                            <lineargradientbrush endpoint="0.5,1" startpoint="0.5,0">
                                                <gradientstop color="#FFFF9E27" offset="0">
                                                <gradientstop color="#FFF58904" offset="1">
                                            </gradientstop></gradientstop></lineargradientbrush>
                                        </grid>
                                        <grid .columndefinitions="">
                                            <columndefinition>
                                            <columndefinition width="Auto">
                                        </columndefinition></columndefinition></grid>
                                        <textblock fontsize="32" horizontalalignment="Left" margin="12,0,0,0" text="Where's my app?" textwrapping="Wrap" verticalalignment="Top" width="200">
                                        <img grid.column="1" horizontalalignment="Right" margin="0" opacity="0.7" source="Images/appSearch.png" />
                                    </textblock></grid>
                                    <toolkit:contextmenuservice .contextmenu="">
                                        <toolkit:contextmenu x:name="MyContextContext">
                                            <toolkit:menuitem click="MenuItem_Click" header="Pin To StartScreen"></toolkit:menuitem>
                                        </toolkit:contextmenu>
                                    </toolkit:contextmenuservice>
                                </button>

i hope this will helps you.....
Labels:

system.runtime.serialization.json not found solution [Solved]

Posted by Unknown 1 comments
system.runtime.serialization.json not found solution [Solved]:

while am doing code with windows phone i found a issue is that i didn't find the name space system.runtime.serialization.json
i found issue was when we are using async programming system.runtime.serialization.json will not work
In order to fix these issue we have to give reference of System.ServiceModel.Web.dll

so we have to give 2 reference 
using System.ServiceModel.Web.dll;
using system.runtime.serialization.json;

hope this will help your in coding
Labels:

Notifications on Secondary Tiles in windows phone 7

Posted by Unknown 2 comments

Notifications on Secondary Tiles in windows phone 7:

in this blog am going explain you about update the secondary tile from the notification service

Since 256-MB Windows Phone Devices fully support Push Notifications, it is possible to change the Secondary Tile content with a little extra effort. In this episode of EvenTiles we will take a look at adding Tile Notifications to the application. Those Tile Notifications are delivered to individual Windows Phone devices through the Microsoft Push Notification Service, just like all other Push Notifications.
In this blog entry we will concentrate on the client side, mainly providing code that registers the application. To test the application, we will make use of a little ASP.NET application that is based on the sample that is introduced in the How to Send and Receive Tile Notifications for Windows Phone article. It is beyond the scope of this blog entry to show how to host a web service (for instance by making use of Azure functionality).
NOTE: The ASP.NET test application cannot be created using Visual Studio 2010 Express for Windows Phone. You either need at least Visual Studio 2010 Professional or the free Visual Web Developer 2010 Expressto create the test application.
Push Notifications on Secondary Tiles
Something that is not entirely clear in the referred How to article, or in the documentation around Push Notifications on MSDN is the fact that sending Tile Updates through Push Notifications is not limited to the Application Tile, but you can also use the same approach to update Secondary Tiles. Since we are dealing with a Secondary Tile in the EvenTiles application, we will focus on updating a Secondary Tile. In the ASP.NET test application we will create the following message to update our tile:
Updating a Seondary Tile
  1. // Create the Tile message.
  2. string tileMessage = "<?xml version=\"1.0\" encoding=\"utf-8\"?>" +
  3. "<wp:Notification xmlns:wp=\"WPNotification\">" +
  4.     "<wp:Tile ID=\"/MainPage.xaml?TileId=Secondary\">" +
  5.       "<wp:BackContent>" + TextBoxBackContent.Text + "</wp:BackContent>" +
  6.       "<wp:Count>" + nrRuns.ToString() + "</wp:Count>" +
  7.    "</wp:Tile> " +
  8. "</wp:Notification>";
By explicitly specifying the ID of a tile you can inform the Push Notification Service that you want to update a specific (Secondary) Tile. Omitting the ID passes the update to the Application Tile. Since EvenTiles creates the Secondary Tile as shown below, passing the Tile Notification message as shown above will update the Secondary Tile if it is pinned to the Start Screen. In the sample we only update the BackContent of the Secondary Tile and the count on the front of it, but it is possible to update more properties of the Secondary Tile. Of course it is important to use the same URI for the Secondary Live Tile when updating it through a Tile Notification.
Creating a Secondary Tile
  1. private void btnInstall_Click(object sender, RoutedEventArgs e)
  2. {
  3.     StandardTileData NewTileData = new StandardTileData
  4.     {
  5.         BackgroundImage = new Uri("Background.png", UriKind.Relative),
  6.         Title = "EvenTiles",
  7.         Count = 0,
  8.         BackBackgroundImage = new Uri("BackBackTile.png", UriKind.Relative),
  9.         BackTitle = "EvenTiles",
  10.         BackContent = App.ActualSecBackContent
  11.     };
  12.     ShellTile.Create(new Uri("/MainPage.xaml?TileId=Secondary", UriKind.Relative), NewTileData);
  13. }
In order to receive Tile Notifications in EvenTiles, the application needs to create aHttpNotificationChannel or attach to an already created channel if the application is started again on a particular Windows Phone device. The following code snippet shows how to setup a new notification channel. If the channel is successfully opened, it will pass a URI through the ChannelUriUpdated event handler. This URI is used to send notifications to the particular Windows Phone Device that received this URI from the Push Notification Service. This URI is unique for the application and the phone on which the application is running. If the channel already exists, this method simply starts listening for channel changes or errors through the ChannelUriUpdated and ErrorOccurred events respectively.
Getting a Notification Channel
  1. public class TileNotifications
  2. {
  3.     public const string tileNotificationChannel = "EvenTilesChannel";
  4.  
  5.     public void SetupChannel()
  6.     {
  7.         var pushChannel = HttpNotificationChannel.Find(tileNotificationChannel);
  8.         if (pushChannel == null)
  9.         {
  10.             pushChannel = new HttpNotificationChannel(tileNotificationChannel);
  11.             pushChannel.ChannelUriUpdated += new EventHandler<NotificationChannelUriEventArgs>(PushChannel_ChannelUriUpdated);
  12.             pushChannel.ErrorOccurred += new EventHandler<NotificationChannelErrorEventArgs>(PushChannel_ErrorOccurred);
  13.             pushChannel.Open();
  14.             pushChannel.BindToShellTile();
  15.         }
  16.         else
  17.         {
  18.             pushChannel.ChannelUriUpdated += new EventHandler<NotificationChannelUriEventArgs>(PushChannel_ChannelUriUpdated);
  19.             pushChannel.ErrorOccurred += new EventHandler<NotificationChannelErrorEventArgs>(PushChannel_ErrorOccurred);
  20.  
  21.             // Display the URI for testing purposes. Normally, the URI would be passed back to a web service.
  22.             System.Diagnostics.Debug.WriteLine(pushChannel.ChannelUri.ToString());
  23.         }
  24.     }
If you want to send out push notifications from a web service, the Windows Phone application typically would send this URI to a web service, that in turn uses it to deliver the push notifications to the registered device. In our test application we simply display the URI in the debug windows of Visual Studio to be able to copy it to our ASP.NET test application.
If you are no longer interested in receiving Tile Notifications for your application, you can close a previously opened HttpNotificationChannel, make sure to dispose of it and also make sure to unsubscribe to events to prevent against leaking memory. The following code snippet shows how you can stop receiving Tile Notifications:
Closing a Notification Channel
  1. public void CloseChannel()
  2. {
  3.     var pushChannel = HttpNotificationChannel.Find(tileNotificationChannel);
  4.     if (pushChannel != null)
  5.     {
  6.         pushChannel.ChannelUriUpdated -= PushChannel_ChannelUriUpdated;
  7.         pushChannel.ErrorOccurred -= PushChannel_ErrorOccurred;
  8.         pushChannel.Close();
  9.         pushChannel.Dispose();
  10.         App.GetLiveTileNotifications = false;
  11.     }
  12. }
Finally, in our EvenTiles application we implement some simplified event handling to react on push channel changes and errors. This implementation is for demonstration purposes only and can be used to manually pass a channel URI to an ASP.NET application or to close down / reinitialize the push channel on certain errors. The following code snippet shows how we simply write the channel URI to the Output Window of Visual Studio.
Handling Push Channel Events
  1. void PushChannel_ErrorOccurred(object sender, NotificationChannelErrorEventArgs e)
  2. {
  3.     switch (e.ErrorType)
  4.     {
  5.         case ChannelErrorType.ChannelOpenFailed:
  6.             App.GetLiveTileNotifications = false;
  7.             break;
  8.         case ChannelErrorType.PayloadFormatError:
  9.             SetupChannel();
  10.             break;
  11.         default:
  12.             CloseChannel();
  13.             break;
  14.     }
  15. }
  16.  
  17. void PushChannel_ChannelUriUpdated(object sender, NotificationChannelUriEventArgs e)
  18. {
  19.     System.Diagnostics.Debug.WriteLine(e.ChannelUri.ToString());
  20.     App.GetLiveTileNotifications = true;
  21. }
imageTo send Tile Notifications to EvenTiles, make sure to run EvenTiles and enable Tile Notifications through the Settings Page. Once Tile Notifications are enabled, you can copy the channel URI from the Visual Studio Output Window and paste it in the ASP.NET test application. After this step, you can send tile updates to EvenTiles.

imageThe ASP.NET test application does so in aThreadPool thread. You can specify the number of updates and the time between updates. Each time another update is send, the count property that will be displayed on the front side of the Secondary Tile that EvenTiles pinned on the start screen will be updated.
Even though Background Agents are not supported on 256-MB devices, we have a nice workaround by making use of Push Notifications because they are fully supported. Of course this means that you need to invest more in server side programming, but it also means that the end user experience of a Windows Phone application can be very similar on both a 512-MB device and a 256-MB device. For this to work, the target device must have a network connection.
The complete sample code for EvenTiles so far can be downloaded here. If you want to test the application on a 256-MB device (emulator), you will need to download and install the Windows Phone 7.1.1 SDK Update as well. The ASP.NET test application is also available as a separate download. In order to run this test application, you need a version of Visual Studio 2010 that supports creating  and debugging ASP.NET applications.
The following video shows how to subscribe to Tile Notifications from within the EvenTiles application and how to test the newly added functionality by means of an APS.NET test application.
Using Push Notifications to update Live Tiles on Windows Phone
Labels:

Getting started with Tile Notifitcation in Windows Phone 7

Posted by Unknown 0 comments
Getting started with Tile Notifitcation in Windows Phone 7


In this article we are going to see how to work with Tile Notification which is one of the Microsoft Push Notification Services available. In our earlier article we have seen how to use the Toast Notification services to create a channel and update the toast messages to the Windows Phone 7 Device with the step by step process. In this tutorial we will follow the same process and see the steps to create the channel and sent the notifications messages.
Tile Notifications are used to show up to date status of an application on the windows phone 7 start screen as a tile. This will work only if the application is pinned to the start screen, basically we can see 3 types of information on the Tile Notifications as follows
  • Count - Also we call this as Badge, is an integer value between 0 to 99. We can specify the count as per the requirement which can be updated on the notifications
  • Background Image - An image property which will display the images as the background for the tile.
  • Title - Title of the application which should normally be with in 15 characters, exceeding the 15 characters will be truncated automatically.
The tile images can be a .jpg or .png files and should be of 173 X 173 pixels to have a better appearance. If less than the specified pixels will be automatically stretched and the look and feel will differ. Let us jump start to see the step by step process on how to achieve these tasks.

Steps

Open Visual Studio 2010 and create a new SIlverlight for Windows Phone 7 Application with a valid project name as shown in the screen below.
vijay1.jpg
Now let us start designing the interface to create a channel, as we discussed in our previous article () we will create the channel first which will be required to communicate for the Tile Notifications. if there are any already available notification events available it will use the same else it will create a new notification event and then connects through the channel. Add the below XAML code to get the channel notification to trigger.
XAML Code
<!--TitlePanel contains the name of the application and page title--><StackPanel x:Name="TitlePanel" Grid.Row="0" Margin="12,17,0,28">    <TextBlock x:Name="ApplicationTitle" Text="F5DEBUG WP7 TUTORIALS" Style="{StaticResourcePhoneTextNormalStyle}"/>    <TextBlock x:Name="PageTitle" Text="Tile Notification" Margin="9,-7,0,0" Style="{StaticResource PhoneTextTitle1Style}"/>
</
StackPanel><!--ContentPanel - place additional content here--><Grid x:Name="ContentPanel" Grid.Row="1" Margin="12,0,12,0">    <Button Content="Establish Channel!!!" Height="149" HorizontalAlignment="Left"Margin="73,88,0,0" Name="button1" VerticalAlignment="Top"
Width="299" Click="button1_Click" />
</
Grid>
Now we need to go to the code behind and start the process of establishing the Notification channel to get the events trigger. To do that first let we need to add the below two using statements.
Code Behind
using Microsoft.Phone.Notification;
using
 System.Diagnostics;
Now we need to write the code to get the open channel details which will be used to send the Tile Notification, to do that we will use the output window to get the channel details. Copy the below code to the code behind page. Also we need to have a method which will do the channel setup step by step, first it will check if the channel is already available if its available we need to check the channel is null if null then we need to close the channel and open a new channel. But initially if the channel is not available then we can directly create the HttpNotificationChannel and do the process to create the channel as shown in the screen below.
Code Behind
private void ChannelSetup()
 {
 HttpNotificationChannel pushtileChannel;
 string strchannelName = "Channel0"; 
pushtileChannel = HttpNotificationChannel.Find(strchannelName);
 if (pushtileChannel == null)
 {
 pushtileChannel = new HttpNotificationChannel(strchannelName);
 pushtileChannel.ChannelUriUpdated += new EventHandler<NotificationChannelUriEventArgs>(PushChannel_ChannelUriUpdated);
 pushtileChannel.ErrorOccurred += new EventHandler<NotificationChannelErrorEventArgs>(PushChannel_ErrorOccurred);
 pushtileChannel.Open();
 pushtileChannel.BindToShellTile();
 }
 else {
 pushtileChannel.ChannelUriUpdated += new EventHandler<NotificationChannelUriEventArgs>(PushChannel_ChannelUriUpdated;
 pushtileChannel.ErrorOccurred += new EventHandler<NotificationChannelErrorEventArgs>(PushChannel_ErrorOccurred);          `         
 System.Diagnostics.Debug.WriteLine(pushtileChannel.ChannelUri.ToString());
 Debug.WriteLine(String.Format("URI : {0}",
 pushtileChannel.ChannelUri.ToString()));
 }
 }
void PushChannel_ChannelUriUpdated(object sender, NotificationChannelUriEventArgs e)
 { 
Dispatcher.BeginInvoke(() =>
 {
 System.Diagnostics.Debug.WriteLine(e.ChannelUri.ToString());
 Debug.WriteLine(String.Format("URI : {0}",
 e.ChannelUri.ToString()));
 });
 } 
void PushChannel_ErrorOccurred(object sender, NotificationChannelErrorEventArgs e)
 {
 Dispatcher.BeginInvoke(() =>
 Debug.WriteLine(String.Format("Tile Notification {0} error occurred. {1} ({2}) {3}",
 e.ErrorType, e.Message, e.ErrorCode, e.ErrorAdditionalData))
 );
}
Now we need to call the above method on the button click event as shown in the screen below.
Code Behind
private void button1_Click(object sender, RoutedEventArgs e)
 {
 ChannelSetup();
 }
Now we are done with the Windows phone 7 client notification application, we will check by building and executing the application and we can see the Windows Phone 7 Emulator as shown in the screen below.
vijay2.jpg
Now click on the Establish Channel button which will establish the channel if not already created else will use existing channel and we can see the channel URI in the Output window since we have coded to get the channel details. To get the output window just go to the Visual Studio tool bar and select View –> Output window and we can see the output window as shown in the screen below.
vijay3.jpg
Let us copy and keep the channel details on to a separate notepad, Now we need to create a Server to post the tile notifications to the application device to show the title.
Now we need to create an background image with 173 X 173 pixel as shown in the screen below and add it to the project solution. Note that we need to make the Build Action from Resource to Content as shown below.
vijay4.jpg

We will create a web page from which we will post the tile notifications and get the notification on to the Windows Phone 7 device. To start with first create a ASP.NET Web application in C# as shown in the screen below.
vijay5.jpg
Now add the below design code to the ASPX page so that we will get the same look and feel for this tutorial, here we have added 4 labels and 4 textboxes to get the user inputs (Channel URI, Front tile message, Background and Notification txt) and a button to trigger the event for the tile message to be sent to the Windows Phone 7 Device. Just copy and paste the below ASPX code
ASPX Code
<%@ Page Title="Home Page" Language="C#" MasterPageFile="~/Site.master"AutoEventWireup="true" CodeBehind="Default.aspx.cs" Inherits="F5debugWp7TileNotificationServer._Default" %><asp:Content ID="HeaderContent" runat="server" ContentPlaceHolderID="HeadContent"> <style type="text/css"> .style1 {
 width: 100%;
 }
 .style2 {
 }
 .style3 {
 width: 690px;
 }
 .style4 {
 width: 143px;
 }
 .style5 {
 width: 38px;
 }
 </style
>
</asp:Content>
<
asp:Content ID="BodyContent" runat="server" ContentPlaceHolderID="MainContent"> <table class="style1"> <tr> <td colspan="3"> <asp:Label ID="Label1" runat="server" Font-Bold="true" Font-Size="Large" Text="F5Debug Windows Phone 7 Tile Notification"></asp:Label> </td> <td> &nbsp;</td> </tr> <tr> <td class="style5"> &nbsp;</td> <td> &nbsp;</td> <td class="style3"> &nbsp;</td> <td> &nbsp;</td> </tr> <tr> <td class="style5"> &nbsp;</td> <td> <asp:Label ID="Label2" runat="server" Text="Notification URI"></asp:Label> </td> <td> <asp:TextBox ID="txtNotURI" runat="server" Width="661px"></asp:TextBox> </td> <td> &nbsp;</td> </tr> <tr> <td class="style5"> &nbsp;</td>
<
td> &nbsp;</td> <td class="style3"> &nbsp;</td> <td> &nbsp;</td> </tr> <tr> <td class="style5"> &nbsp;</td> <td> <asp:Label ID="Label5" runat="server" Text="Notification Front Tile"></asp:Label> </td> <td class="style3"> <asp:TextBox ID="txtNotFrontTile" runat="server" Width="661px"></asp:TextBox> </td> <td> &nbsp;</td> </tr> <tr> <td> &nbsp;</td> <td class="style4"> &nbsp;</td> <td> &nbsp;</td> <td> &nbsp;</td> </tr> <tr> <td> &nbsp;</td> <td class="style4"> <asp:Label ID="Label3" runat="server" Text="Notification Background"></asp:Label> </td> <td> <asp:TextBox ID="txtNotBck" runat="server" Width="661px"></asp:TextBox> </td>
<
td> &nbsp;</td> </tr> <tr> <td class="style5"> &nbsp;</td> <td> &nbsp;</td> <td class="style3"> &nbsp;</td> <td>&nbsp;</td> </tr> <tr> <td class="style5"> &nbsp;</td> <td> <asp:Label ID="Label4" runat="server" Text="Notification Count"></asp:Label> </td> <td> <asp:TextBox ID="txtNotCount" runat="server" Width="659px"></asp:TextBox> </td> <td> &nbsp;</td> </tr> <tr> <td class="style5"> &nbsp;</td> <td> &nbsp;</td> <td class="style3"> &nbsp;</td> <td> &nbsp;</td> </tr> <tr> <td class="style5"> &nbsp;</td> <td> <asp:Button ID="btnSendNote" runat="server" Font-Bold="True" onclick="Button1_Click" Text="Send Notification" Width="134px" /> </td> <td> <asp:Label ID="lblresult" runat="server"></asp:Label> </td> <td> &nbsp;</td> </tr> </table
>
</asp:Content> 
vijay6.jpg
Now go to the code behind and add the below code, this code will get the user inputs mainly the Channel URI, background and the tile information and pass the message to the Microsoft Push Notification services. Just copy the below code to proceed further.
Code Behind
using System;using System.Collections.Generic;using System.Linq;using System.Web;using System.Web.UI;using System.Web.UI.WebControls;using System.Net;using System.IO;using System.Text; namespace F5debugWp7TileNotificationServer
{
    public partial class _Default : System.Web.UI.Page
    {
        protected void Page_Load(object sender, EventArgs e)
        {
        }
        protected void Button1_Click(object sender, EventArgs e)
        {
            string PushNotificationXML ="<?xml version=\"1.0\" encoding=\"utf-8\"?>" + "<wp:Notification xmlns:wp=\"WPNotification\">" +
"<wp:Tile>" +
            "<wp:BackgroundImage>" + txtNotBck.Text + "</wp:BackgroundImage>" + "<wp:Count>"+ txtNotCount.Text +"</wp:Count>" +"<wp:Title>" +
            txtNotFrontTile.Text + "</wp:Title>" + "</wp:Tile> " +"</wp:Notification>";
            string strChannelURI = txtNotURI.Text.ToString();
            string strNotificationBackground = txtNotBck.Text.ToString();
            string strNotifitcationCount = txtNotCount.Text.ToString();
            string strNotifitcationFronttile = txtNotFrontTile.Text.ToString();
            if (strChannelURI ==string.Empty || strNotificationBackground == string.Empty || strNotifitcationCount == string.Empty ||
strNotifitcationFronttile == string.Empty)
            {
                lblresult.Text = "All the fields are Mandatory!!!";
                return;
            } 
            HttpWebRequest sendNotificationRequest = (HttpWebRequest)WebRequest.Create(strChannelURI);
            sendNotificationRequest.Method = "POST";
            byte[] notificationMessage =Encoding.Default.GetBytes(PushNotificationXML); 
            // Set the web request content length.            sendNotificationRequest.ContentLength = notificationMessage.Length;
            sendNotificationRequest.ContentType ="text/xml";
            sendNotificationRequest.Headers.Add("X-WindowsPhone-Target","token");
            sendNotificationRequest.Headers.Add("X-NotificationClass","1");
            using (Stream requestStream = sendNotificationRequest.GetRequestStream())
            {
                requestStream.Write(notificationMessage, 0, notificationMessage.Length);
            }
            // Send the notification and get the response.            HttpWebResponse response = (HttpWebResponse)sendNotificationRequest.GetResponse();
            string notificationStatus = response.Headers["X-NotificationStatus"];
            string notificationChannelStatus = response.Headers["X-SubscriptionStatus"];
            string deviceConnectionStatus = response.Headers["X-DeviceConnectionStatus"];
            lblresult.Text = "Status: " + notificationStatus + " | " + deviceConnectionStatus + " | " + notificationChannelStatus;
        }
    }
}
Now we are done with our server code, to test tile notification first run the Windows Phone 7 application (F5debugWp7TileNotification) and get the Channel URI. Once we got the URL click on the Back button and navigate to the application list. Point our application F5debugWp7TileNotification by pressing continuously using the mouse pointer and we can see the context menu as shown in the screen below.
vijay7.jpg
Now select pin to start from the menu and we can see the application is pinned to the Tile as shown in the screen below.
vijay8.jpg
Now run the project F5debugWp7TileNotificationServer web application and enter the values as shown in the screen below.
vijay9.jpg
Now click on Send Notification button and we can see the result in the label at the bottom as shown in the screen below.
vijay10.jpg
Now go to the Windows Phone 7 Emulator and we can see the Tile notification message which we send from the web application as shown in the screen below.
vijay11.jpg
Labels:
 
test